CCNA Security 2.0 PT Practice SA – Part 1
A few things to keep in mind while completing this activity:
- Do not use the browser Back button or close or reload any exam windows during the exam.
- Do not close Packet Tracer when you are done. It will close automatically.
- Click the Submit Assessment button to submit your work.
Introduction

In this practice Packet Tracer Skills Based Assessment, you will:
- configure basic device hardening and secure network management
- configure port security and disable unused switch ports
- configure an IOS IPS
- configure a Zone-based Policy Firewall (ZPF) to implement security policies
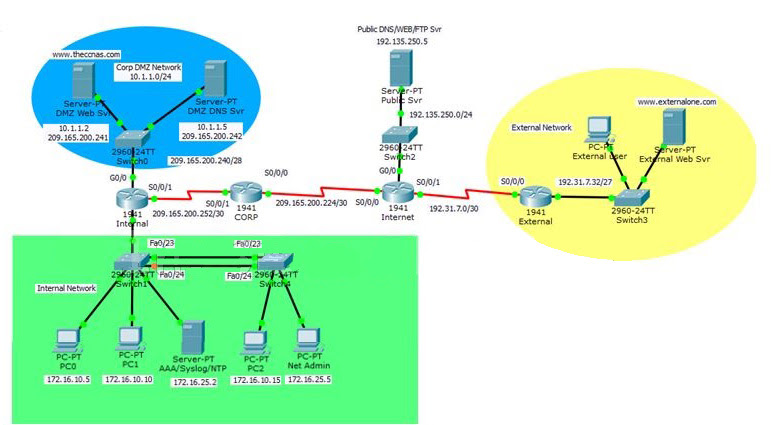
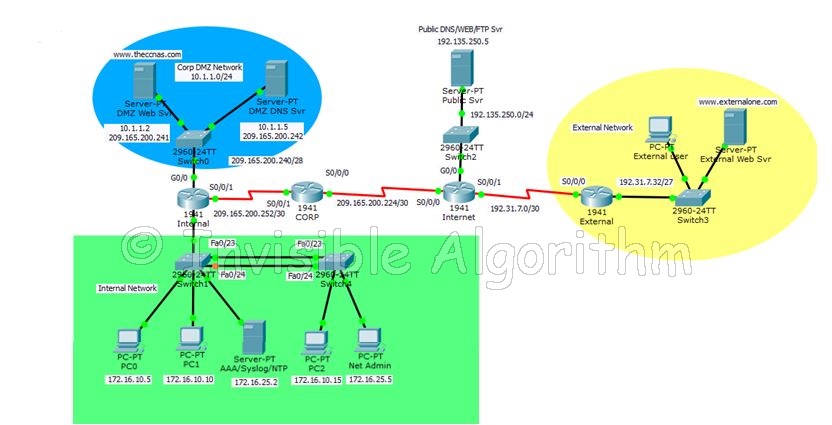
Addressing Table
| Device | Interface | IP Address | Subnet Mask | Gateway | DNS server |
|---|---|---|---|---|---|
| Internet | S0/0/0 | 209.165.200.225 | 255.255.255.252 | n/a | |
| S0/0/1 | 192.31.7.1 | 255.255.255.252 | n/a | ||
| G0/0 | 192.135.250.1 | 255.255.255.0 | n/a | ||
| Public Svr | NIC | 192.135.250.5 | 255.255.255.0 | 192.135.250.1 | |
| External | S0/0/0 | S0/0/0 | 255.255.255.252 | n/a | |
| G0/0 | 192.31.7.62 | 255.255.255.224 | n/a | ||
| External Web Svr | NIC | 192.31.7.35 | 255.255.255.224 | 192.31.7.62 | 192.135.250.5 |
| External User | NIC | 192.31.7.33 | 255.255.255.224 | 192.31.7.62 | 192.135.250.5 |
| CORP | S0/0/0 | 209.165.200.226 | 255.255.255.252 | n/a | |
| S0/0/1 | 209.165.200.254 | 255.255.255.252 | n/a | ||
| Internal | S0/0/1 | 209.165.200.253 | 255.255.255.252 | n/a | |
| G0/0 | 10.1.1.254 | 255.255.255.0 | n/a | ||
| G0/1.10 | 172.16.10.254 | 255.255.255.0 | n/a | ||
| G0/1.25 | 172.16.25.254 | 255.255.255.0 | n/a | ||
| G0/1.99 | 172.16.99.1 | 255.255.255.0 | n/a | ||
| DMZ DNS Svr | NIC | 10.1.1.5 | 255.255.255.0 | 10.1.1.254 | 192.135.250.5 |
| DMZ Web Svr | NIC | 10.1.1.2 | 255.255.255.0 | 10.1.1.254 | 10.1.1.5 |
| PC0 | NIC | 172.16.10.5 | 255.255.255.0 | 172.16.10.254 | 10.1.1.5 |
| PC1 | NIC | 172.16.10.10 | 255.255.255.0 | 172.16.10.254 | 10.1.1.5 |
| AAA/NTP/ Syslog Svr | NIC | 172.16.25.2 | 255.255.255.0 | 172.16.25.254 | 10.1.1.5 |
| PC2 | NIC | 172.16.10.15 | 255.255.255.0 | 172.16.10.254 | 10.1.1.5 |
| Net Admin | NIC | 172.16.25.5 | 255.255.255.0 | 172.16.25.254 | 10.1.1.5 |
Note: Appropriate verification procedures should be taken after each configuration task to ensure that it has been properly implemented.
Step 1: Configure Basic Device Hardening for the CORP and the Internal Routers.
- Configure the CORP and the Internal routers to only accept passwords with a minimum length of 10 characters.
- Configure an encrypted privileged level password of ciscoclass.
- Enable password encryption for all clear text passwords in the configuration file.
- Configure the console port and all vty lines with the following requirements:Note: Both the CORP and the Internal routers are already configured with the username CORPADMIN and password Ciscoccnas.
– Use the local database for login.
– Disconnect after being idle for 20 minutes. - Disable the CDP protocol on the CORP router on the link to the Internet router.
Step 2: Configure Secure Network Management for the CORP Router.
Configure the IOS login enhancement for all vty lines with the following requirements:
– Disable logins for 30 seconds after 3 failed login attempts within 60 seconds.
Step 3: Configure Secure Network Management for the Internal Router.
- Configure the Internal router:
– as an NTP client to the AAA/NTP/Syslog server
– to update the router calendar (hardware clock) from the NTP time source
– to timestamp log messages
– to send logging messages to the AAA/NTP/Syslog server - Configure the IOS login enhancement for all vty lines with the following requirements:
– Disable logins for 30 seconds after 3 failed login attempts within 60 seconds.
– Log any failed or successful login to the syslog server. - Configure the Internal router to accept SSH connections. Use the following guidelines:Note: Internal is already configured with the username SSHAccess and the secret password ciscosshaccess.
– The domain name is theccnas.com.
– RSA encryption key pair using a modulus of 1024
– SSH version 2, timeout of 90 seconds, and 2 authentication retries
– All vty lines accept only SSH connections. - Configure the Internal router with server-based AAA authentication and verify its functionality:Note: The AAA server is already configured with RADIUS service, a username CORPSYS, and the password LetSysIn.
– The key to connect to the RADIUS server is corpradius.
– AAA authentication uses the RADIUS server as the default for console line and vty lines access.
– The local database is used as the backup if the RADIUS server connection cannot be established.
Step 4: Configure ACLs on the Internal Router to Implement Secure Management Access.
Create ACL 12 to implement the security policy regarding the access to the vty lines:
– Only users logged on to the Net Admin PC are allowed access to the vty lines.
Step 5: Configure Device Hardening for Switch1 and Switch4
- Access Switch1 and Switch4 with username CORPADMIN, password Ciscoccnas, and the enable secret password of ciscoclass.
- Configure Switch1 to protect against STP attacks.
– Configure PortFast on FastEthernet ports 0/1 to 0/22.
– Enable BPDU guard on FastEthernet ports 0/1 to 0/22. - Configure Switch1 port security and disable unused ports.
– Set the maximum number of learned MAC addresses to 2 on FastEthernet ports 0/1 to 0/22. Allow the MAC address to be learned dynamically and to be retained in the running-config. Shutdown the port if a violation occurs.
– Disable unused ports (Fa0/2-4, Fa0/6-10, Fa0/13-22). - Configure the trunk link on Fa0/23 and Fa0/24 on both Switch1 and Switch4
– Disable DTP negotiation on the trunking ports.
– Set the native VLAN as VLAN 50 for the trunk links.
Step 6: Configure an IOS IPS on the Internal Router.
- On the Internal router, if asked to login, then login as CORPSYS with password LetSysIn. The enable secret password is ciscoclass.
- Use the IPS signature storage location at flash:.
- Create an IPS rule named corpips.
- Configure the IOS IPS to use the signature categories. Retire the all signature category and unretire the ios_ips basic category.
- Apply the IPS rule to the Gi0/0 interface in the out direction.
- Modify the ios_ips basic category. Unretire the echo request signature (signature 2004, subsig 0); enable the signature; modify the signature event-action to produce an alert and deny packets that match the signature.
- Verify that IPS is working properly. Net Admin in the internal network cannot ping DMZ Web Svr. DMZ Web Svr, however, can ping Net Admin.
Step 7: Configure ZPF on the CORP Router.
- Access the CORP router with username CORPADMIN, password Ciscoccnas, and the enable secret password of ciscoclass.
- Create the firewall zones.
– Create an internal zone named CORP-INSIDE.
– Create an external zone named INTERNET. - Define a traffic class to allow traffic from the Internal network to access services in the Internet.
– Create a class map using the option of class map type inspect with the match-any keyword. Name the class map INSIDE_PROTOCOLS.
– Match the protocols, http, tcp, udp, icmp, dns (Please note, the order of match statements is significant only because of the scoring need in Packet Tracer.) - Specify firewall policies to allow internal hosts to access Internet.
– Create a policy map named INSIDE_TO_INTERNET.
– Use the INSIDE_PROTOCOLS class map.
– Specify the action of inspect for this policy map. - Define a traffic class to allow traffic from the Internet to access services in the DMZ network.
– Create a class map using the option of class map type inspect with the match-any keyword. Name the class map DMZ_WEB.
– Match the protocols, http and dns (Please note, the order of match statements is significant only because of the scoring need in Packet Tracer.) - Specify firewall policy to allow Internet traffic to access DMZ services.
– Create a policy map named INTERNET_TO_DMZWEB.
– Use the DMZ_WEB class map.
– Specify the action of pass for this policy map. - Apply the firewall.
– Create a pair of zones named IN_TO_OUT_ZONE with the source as CORP-INSIDE and destination as INTERNET.
– Specify the policy map INSIDE_TO_INTERNET for handling the traffic between the two zones.
– Create a pair of zones named INTERNET_TO_DMZ_ZONE with the source as INTERNET and destination as CORP-INSIDE.
– Assign interfaces to the appropriate security zones. - Verify the ZPF configuration.
– The External user can access the URLs http://www.theccnas.com and http://www.externalone.com.
– The External user cannot ping the DMZ Web Svr.
– The PCs in the internal network can ping and access the External Web Svr URL.
**** End Of Question ****

Answers – Intructions (100% Scores updated)
ROUTER CORP
enable
configure terminal
security passwords min-length 10
enable secret ciscoclass
service password-encryption
line console 0
login local
exec-timeout 20 0
line vty 0 15
login local
exec-timeout 20 0
exit
interface serial0/0/0
no cdp enable
login block-for 30 attempts 3 within 60
zone security CORP-INSIDE
exit
zone security INTERNET
exit
class-map type inspect match-any INSIDE_PROTOCOLS
match protocol http
match protocol tcp
match protocol udp
match protocol icmp
match protocol dns
exit
policy-map type inspect INSIDE_TO_INTERNET
class type inspect INSIDE_PROTOCOLS
inspect
exit
exit
class-map type inspect match-any DMZ_WEB
match protocol http
match protocol dns
exit
policy-map type inspect INTERNET_TO_DMZWEB
class type inspect DMZ_WEB
pass
exit
exit
zone-pair security IN_TO_OUT_ZONE source CORP-INSIDE destination INTERNET
service-policy type inspect INSIDE_TO_INTERNET
exit
zone-pair security INTERNET_TO_DMZ_ZONE source INTERNET destination CORP-INSIDE
service-policy type inspect INTERNET_TO_DMZWEB
exit
interface serial0/0/0
zone-member security INTERNET
exit
interface serial0/0/1
zone-member security CORP-INSIDE
exit
Router INTERNAL
enable
configure terminal
security passwords min-length 10
enable secret ciscoclass
service password-encryption
login on-failure log
login on-success log
line console 0
login local
exec-timeout 20 0
line vty 0 15
login local
exec-timeout 20 0
exit
interface serial0/0/0
no cdp enable
login block-for 30 attempts 3 within 60
ntp server 172.16.25.2 key 0
ntp update-calendar
service timestamps log datetime msec
logging host 172.16.25.2
ip domain-name theccnas.com
crypto key generate rsa
1024

ip ssh version 2
ip ssh time-out 90
ip ssh authentication-retries 2
line vty 0 4
transport input ssh
exit
line vty 5 15
transport input ssh
exit
aaa new-model
Radius-server host 172.16.25.2 key corpradius
aaa authentication login default group radius local
aaa authorization exec default local
line vty 0 4
login authentication default
line vty 5 15
login authentication default
line con 0
login authentication default
exit
access-list 12 permit host 172.16.25.5
line vty 0 15
access-class 12 in
exit
ip ips config location flash:
ip ips name corpips
ip ips signature-category
category all
retired true
exit
category ios_ips basic
retired false
exit
exit

interface Gi0/0
ip ips corpips out
exit
ip ips signature-definition
signature 2004 0
status
retired false
enable true
exit
engine
event-action produce-alert
event-action deny-packet-inline
exit
exit
exit

exit
Switch1 Config
configure terminal
interface range fastEthernet0/1-22
spanning-tree portfast
spanning-tree bpduguard enable
switchport port-security
switchport port-security violation shutdown
switchport port-security mac-address sticky
switchport port-security maximum 2
exit
interface range fastethernet 0/2-4
shutdown
interface range fastethernet 0/6-10
shutdown
interface range fastethernet 0/13-22
shutdown
exit
interface range fa0/23-24
switchport nonegotiate
switchport trunk native vlan 50
Switch 4
configure terminal
interface range fa0/23-24
switchport mode trunk
switchport nonegotiate
switchport trunk native vlan 50