Network Security 1.0 Final PT Skills Exam (PTSA) Answers

How to find: Press “Ctrl + F” in the browser and fill in whatever wording is in the question to find that question/answer. If the question is not here, find it in Questions Bank.
NOTE: If you have the new question on this test, please comment Question and Multiple-Choice list in form below this article. We will update answers for you in the shortest time. Thank you! We truly value your contribution to the website.

Network Security (Version 1) – Network Security Final PT Skills Assessment (PTSA)

Network Security 1.0 Final PT Skills Exam (PTSA)

Network Security – Practice PT Skills Assessment (PTSA) Answers

A few things to keep in mind while completing this activity:

  • Do not use the browser Back button or close or reload any Exam windows during the exam.
  • Do not close Packet Tracer when you are done. It will close automatically.
  • Click the Submit Assessment button to submit your work.

Objectives

In this practice Packet Tracer Skills Based Assessment, you will:

  • Configure an ASA firewall to implement security policies.
  • Configure Layer 2 security on a LAN switch.
  • Configure a site-to-site IPsec VPN

Background / Scenario

Your company has been hired by a used car dealership that has a corporate headquarters and multiple branch offices. The Car1 Company has become concerned about network security and has contracted you to implement Layer 2 security, an ASA device, and VPN services from HQ to the branches. Your job is to prototype the network in the lab prior to your company installing the equipment at the Car1 sites. In this case, you will only implement a VPN between headquarters and a single branch.

Note: Some values and approaches to configuring devices in this simulated assessment may not conform to current security best practices. In some cases, values have been simplified to streamline the assessment, and in other cases, values have been used by necessity in order to facilitate the assessment of certain skills in Packet Tracer.

Instructions

Addressing Table

DeviceInterfaceIP AddressSubnet MaskGatewayDNS server
InternetS0/0/0209.165.200.225255.255.255.252n/an/a
InternetS0/0/1192.31.7.1255.255.255.252n/an/a
InternetS0/1/0198.133.219.1255.255.255.252n/an/a
InternetG0/0192.135.250.1255.255.255.0n/an/a
HQS0/0/0209.165.200.226255.255.255.252n/an/a
HQG0/0209.165.200.254255.255.255.240n/an/a
HQ-ASA5506G1/1209.165.200.253255.255.255.240n/an/a
HQ-ASA5506G1/2192.168.10.1255.255.255.0n/an/a
HQ-ASA5506G1/3192.168.20.1255.255.255.0n/an/a
BranchS0/0/0198.133.219.2255.255.255.252n/an/a
BranchG0/0198.133.219.62255.255.255.224n/an/a
ExternalWeb SvrNIC192.31.7.35255.255.255.224192.31.7.62n/a
ExternalUserNIC192.31.7.33255.255.255.224192.31.7.62192.135.250.5
AAA/NTP/SyslogSvrNIC192.168.10.10255.255.255.0192.168.10.1n/a
DMZDNS SvrNIC192.168.20.5255.255.255.0192.168.20.1n/a
DMZWeb SvrNIC192.168.20.2255.255.255.0192.168.20.1192.168.20.5
PC0,PC1, and PC2NICDHCPclient255.255.255.0192.168.10.1192.168.10.10
BranchAdminNIC198.133.219.35255.255.255.224198.133.219.62192.135.250.5
NetAdmin PCNIC192.168.10.250255.255.255.0192.168.10.1192.168.10.10

Part 1: Configure the ASA 5506-X

Step 1: Configure Basic Settings on the ASA device.

HQ-ASA5506 is already configured with a password: Thecar1Admin.

Note: In order to receive full credit for you configuration, you must save your configuration file after making any changes to the device configuration.

  • a. Configure the domain name as thecar1.com.
  • b. Configure the hostname as HQ-ASA5506.
  • c. Configure the INSIDE, OUTSIDE, and DMZ interfaces with the following:
    • IP address 209.165.200.253/28, nameif OUTSIDE, security-level 1, assign to G1/1
    • IP address 192.168.10.1/24, nameif INSIDE, security-level 100, assign to G1/2
    • IP address 192.168.20.1/24, nameif DMZ, security-level 70, assign to G1/3

HQ-ASA5506

enable
Thecar1Admin
conf term
domain-name thecar1.com
hostname HQ-ASA5506

interface g1/1   
nameif OUTSIDE
security-level 1
ip address 209.165.200.253 255.255.255.240
no shutdown

interface g1/2
nameif INSIDE
security-level 100
ip address 192.168.10.1 255.255.255.0
no shutdown

interface g1/3
nameif DMZ
security-level 70
ip address 192.168.20.1 255.255.255.0
no shutdown
exit

NOTE: After this step, check again to make sure that the interfaces G1/1, G1/2, G1/3 are configured with IP addresses. If there is any interface that does not receive an IP address, please reconfigure the IP address for that interface.
Network Security 1.0 Final PT Skills Assessment (PTSA) Exam 5

Step 2: Configure the DHCP service on the ASA device for the internal network.
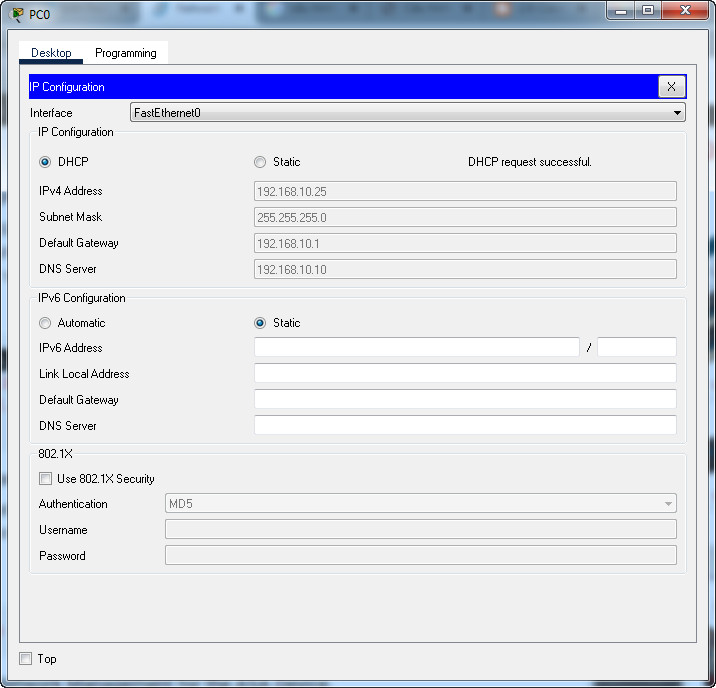
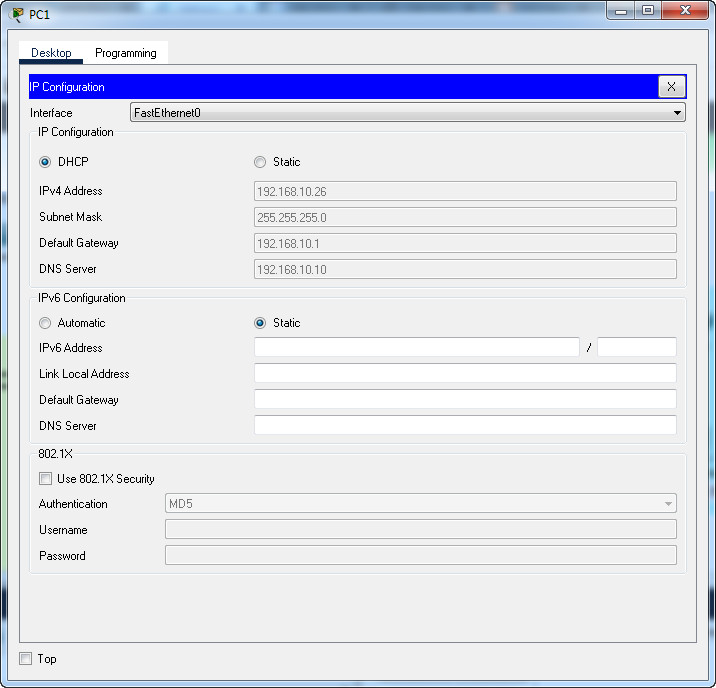
  • a. The DHCP pool is 192.168.10.25 – 192.168.10.35.
  • b. The DHCP service should provide DNS server (AAA/NTP/syslog server) information.
  • c. PC0, PC1, and PC2 should receive their addresses over DHCP.

HQ-ASA5506

dhcpd address 192.168.10.25-192.168.10.35 INSIDE
dhcpd dns 192.168.10.10 interface INSIDE
dhcpd option 3 ip 192.168.10.1
dhcpd enable INSIDE

PC0-PC1-PC2 received their addresses over DHCP

Step 3: Configure routing on the ASA.

Configure a default route that will enable hosts on the HQ INTERNAL and DMZ networks to communicate with outside hosts. Use the IP address of the HQ router interface as the gateway interface.
HQ-ASA5506

route OUTSIDE 0.0.0.0 0.0.0.0 209.165.200.254
Step 4: Configure Secure Network Management for the ASA Device.

a. Configure the ASA with NTP and AAA:

  1. The ASA is a NTP client to the AAA/NTP/Syslog server.
  2. Enable the authentication to the ASA.
  3. The authentication key is key 1 with the password is corpkey.

HQ-ASA5506

ntp authenticate
ntp authentication-key 1 md5 corpkey
ntp server 192.168.10.10
ntp trusted-key 1

b. Configure AAA and SSH.

  1. Configure the ASA device with AAA authentication using the username of Car1Admin and password of adminpass01.
  2. Configure AAA to use the local database for SSH connections to the console port.
  3. Generate a RSA key pair to support with modulus size of 1024 bits.
  4. Configure HQ-ASA5506 to accept SSH connections only from the Net Admin workstation.
  5. Configure SSH session timeout to be 20 minutes.

HQ-ASA5506

username Car1Admin password adminpass01
aaa authentication ssh console LOCAL
crypto key generate rsa modulus 1024
yes
ssh 192.168.10.250 255.255.255.255 INSIDE
ssh timeout 20
Step 5: Configure NAT Service for the ASA device for both INSIDE and DMZ networks.
  • a. Create a network object called INSIDE-nat with subnet 192.168.10.0/24 and enable the IP addresses of the hosts in the internal network to be dynamically translated to access the external network via the outside interface.
  • b. Create a network object DMZ-web-server to statically translate the DMZ web server internal IP address to the outside public IP address 209.165.200.241.
  • c. Create a network object DMZ-dns-server to statically translate the DMZ DNS server internal IP address to the outside public IP address 209.165.200.242.

HQ-ASA5506

object network INSIDE-nat
subnet 192.168.10.0 255.255.255.0
nat (inside,outside) dynamic interface
exit
configure terminal 
object network DMZ-web-server
host 192.168.20.2
nat (dmz,outside) static 209.165.200.241
exit
configure terminal 
object network DMZ-dns-server
host 192.168.20.5
nat (dmz,outside) static 209.165.200.242
exit
Step 6: Configure ACL on the ASA device to implement the Security Policy.

a. Configure a named extended ACL to permit inside hosts to be translated to the pool of outside IP addresses. Name the ACL NAT-IP-ALL.

b. Apply NAT-IP-ALL ACL to the DMZ and OUTSIDE interfaces in the inward direction.

c. Configure an ACL to allow access to the DMZ servers from the internet. Create an extended named ACL (named OUTSIDE-TO-DMZ) to filter incoming traffic to the HQ ASA. The ACL statements should be created in the order specified in the following guidelines:
(Note: The order of ACL statements is significant only because of the scoring requirements for this assessment.)

  1. The ACL should contain four access control entries (ACEs).
  2. HTTP traffic is allowed to DMZ Web Svr.
  3. DNS traffic (both TCP and UDP) is allowed to the DMZ DNS server (two separate ACEs).
  4. FTP traffic from the Branch administrator workstation is allowed to the DMZ web server.

Note: For the purposes of this assessment, do NOT apply this ACL.
HQ-ASA5506

configure terminal
access-list NAT-IP-ALL extended permit ip any any

access-group NAT-IP-ALL in interface OUTSIDE
access-group NAT-IP-ALL in interface DMZ

access-list OUTSIDE-TO-DMZ extended permit tcp any host 209.165.200.241 eq 80
access-list OUTSIDE-TO-DMZ extended permit tcp any host 209.165.200.242 eq 53
access-list OUTSIDE-TO-DMZ extended permit udp any host 209.165.200.242 eq 53
access-list OUTSIDE-TO-DMZ extended permit tcp host 198.133.219.35 host 209.165.200.241 eq ftp

end
copy running-config startup-config

Part 2: Configure Layer 2 Security on a Switch

For this part of the assessment, you will be configuring Switch1 in the internal network with Layer 2 attack mitigation measures.

Step 1: Disable Unused Switch Ports
  • a. Disable all unused switch ports on Switch1.
  • b. Configure all unused ports in static access mode so that they will not negotiate trunks.

Switch 1

enable
conf t
interface range f0/2-4, f0/6-9, f0/11-22, g0/2
shutdown
switchport mode access
switchport nonegotiate
Step 2: Implement Port Security

On Switch1, configure port security on all of the switch ports that are connected to hosts according to the following requirements:

  • The ports should be configured as static access ports.
  • The ports should learn a maximum of two MAC addresses.
  • The ports should record the MAC addresses that have been learned in the device running configuration.
  • If a violation occurs, the port should drop packets from host MAC addresses that have not been learned, increment the violation counter, and generate a syslog message.

Switch 1

interface range f0/1, f0/5, f0/10
switchport mode access
switchport port-security
switchport port-security maximum 2
switchport port-security mac-address sticky
switchport port-security violation restrict
switchport nonegotiate
Step 3: Implement STP Security

On Switch1, implement STP security measures on the active ports that are connected to hosts.

  • a. Configure the switch to disable host ports that receive a BPDU.
  • b. Configure the ports to quickly go into STP forwarding mode without going through the STP transitional modes. Do this on a port-by-port basis, not on the entire switch.

Switch 1

interface range f0/1, f0/5, f0/10, g0/1
spanning-tree bpduguard enable
spanning-tree portfast

end
copy running-config startup-config

Part 3: Configure a Site-to-Site IPsec VPN between the HQ and the Branch Routers

Note: The Branch and HQ routers have already been configured with a username of CORPADMIN and a password of NetSec-Admin1. The enable secret password is RTR-AdminP@55.

Configure a site-to-site IPsec VPN between the HQ and Branch routers according to the requirements below.

The following tables list the parameters for the ISAKMP phase 1 and phase 2 policies:

ISAKMP Phase 1 Policy Parameters

Key Distribution MethodISAKMP
EncryptionAlgorithmAES
Numberof Bits256
HashAlgorithmSHA-1
AuthenticationMethodPre-share
KeyExchangeDH2
IKESA Lifetime1800
ISAKMPKeyVpnpass101

IPsec Phase 2 Policy Parameters Table

ParametersHQ RouterBranch Router
TransformSet NameVPN-SETVPN-SET
TransformSetesp-aesesp-sha-hmacesp-aesesp-sha-hmac
PeerHost NameBranchHQ
PeerIP Address198.133.219.2209.165.200.226
EncryptedNetwork209.165.200.240/28198.133.219.32/27
CryptoMap NameVPN-MAPVPN-MAP
SAEstablishmentipsec-isakmpipsec-isakmp

a.Configure ACL 120 on the HQ router to identify the interesting traffic to be sent across the VPN. The interesting traffic is all IP traffic from the HQ LAN to the Branch LAN.

b.Configure the ISAKMP Phase 1 properties on the HQ router. The crypto ISAKMP policy is 10. Refer to the ISAKMP Phase 1 Policy Parameters Table for the specific details needed.

c.Configure the ISAKMP Phase 2 properties on the HQ router using 10 as the sequence number. Refer to the ISAKMP Phase 2 Policy Parameters Table for the specific details needed.

d.Bind the VPN-MAP crypto map to the outgoing interface.

e.Configure IPsec parameters on the Branch router using the same parameters as on the HQ router. Note that interesting traffic is defined as the IP traffic from the Branch LAN to the LAN that is attached to HQ.

f.Save the running-config, then reload both the HQ and Branch routers.

HQ Router

Username: CORPADMIN
Password: NetSec-Admin1
enable
Password: RTR-AdminP@55
conf ter

access-list 120 permit ip 209.165.200.240 0.0.0.15 198.133.219.32 0.0.0.31

crypto isakmp policy 10
encryption aes 256
hash sha
authentication pre-share
group 2
lifetime 1800
exit

crypto isakmp key Vpnpass101 address 198.133.219.2

crypto ipsec transform-set VPN-SET esp-aes esp-sha-hmac

crypto map VPN-MAP 10 ipsec-isakmp
match address 120
set transform-set VPN-SET
set peer 198.133.219.2
set pfs group2
set security-association lifetime seconds 1800
exit

int s0/0/0
crypto map VPN-MAP
end   
copy running-config startup-config

Branch Router

Username: CORPADMIN
Password: NetSec-Admin1
enable
Password: RTR-AdminP@55
conf ter

access-list 120 permit ip 198.133.219.32 0.0.0.31 209.165.200.240 0.0.0.15

crypto isakmp policy 10
encryption aes 256
hash sha
authentication pre-share
group 2
lifetime 1800
exit

crypto isakmp key Vpnpass101 address 209.165.200.226

crypto ipsec transform-set VPN-SET esp-aes esp-sha-hmac

crypto map VPN-MAP 10 ipsec-isakmp
match address 120
set transform-set VPN-SET
set peer 209.165.200.226
set pfs group2
set security-association lifetime seconds 1800
exit

int s0/0/0
crypto map VPN-MAP
end   
copy running-config startup-config

Leave a Reply

Your email address will not be published. Required fields are marked *

Ads Blocker Image Powered by Code Help Pro

Ads Blocker Detected!!!

We have detected that you are using extensions to block ads. Please support us by disabling these ads blocker.

Translate »